As I'm moving towards studying at the university, I got myself a flat, which makes it perfect for hosting another server, with better capacities and a better Internet connectivity. I was (and still will be for probably about a week) worried of losing mails due to an electric/internet/disk failure on my only server. Thanks to this new opportunity, I'll have good-enough redundancy to stop caring.
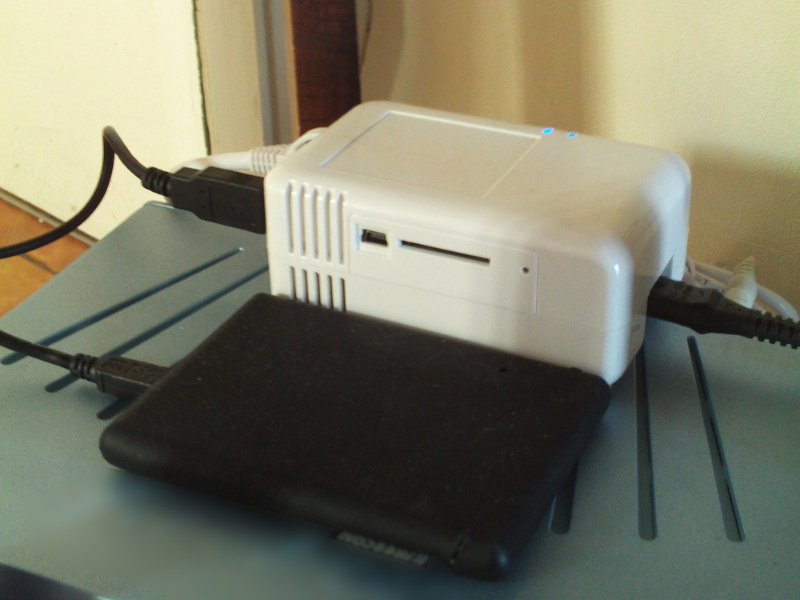
SheevaPlug
My current server is a SheevaPlug, which embeds the kirkwood platform -- not so powerful, but apparently just enough for my needs. The biggest drawback of this device is its lack of connectivity: only one ethernet (not that I really care for more, but it can come in handy), one USB2 port and one sdcard port. Its internal memory is 512Mib NAND and there is no WiFi/bluetooth/audio: just fine for a home server with an external USB disk, but cannot do much more. It is also known to have a PSU over-heating problem (or something of the same sort) that is supposed to make it unusable soon enough. I didn't encounter the issue so far and I've been using it for about 2 or 3 years now. What I'm more concerned about however is the health of the external USB disk. Not that I've seen I/O errors, but it sometimes (maybe once every 4 or 5 months) seems to disconnect, and I have to reboot the plug.
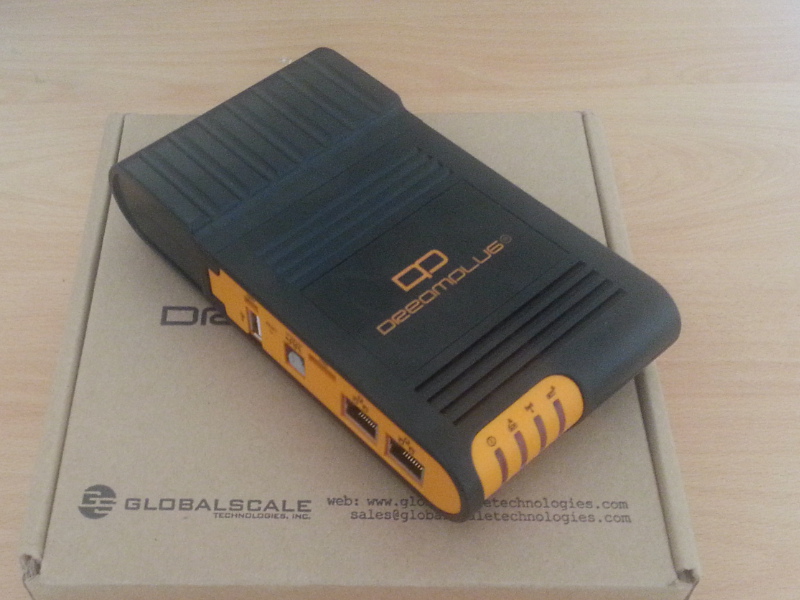
DreamPlug
So I decided to go with a DreamPlug for my new place: more connectivity (including e-SATA), more internal storage (on mmc instead of NAND) and a presumably safer PSU. Note that the UART/JTAG module is sold separately, while the SheevaPlug has it embedded. For more details and comparisons between the two devices, I'm maintaining the Plug Computers hardware resource page at LibrePlanet. The device ships with Debian pre-installed, but I prefer to reinstall a sane base and reflash the bootloader. Moreover, the DreamPlug (and the SheevaPlug as well) have full-blown Debian support, with bootable installer images.
Installing Debian Wheezy
Being very happy with the Debian support for both these devices, I started by installing Wheezy on the DreamPlug. Reflashing the bootloader went well: the pre-installed version was U-Boot 2011.06 (Oct 15 2011 - 02:02:08) and was upgraded to U-Boot 2012.04.01 (Jun 01 2012 - 02:17:08) which is the version in the wheezy u-boot package. Then I went on to booting the installer uImage and uInitrd (respectively the kernel and initramfs images in u-boot format) from TFTP: I used tftpd which uses the inetd superserver and can be configured from /etc/inetd.conf.
As the installation went through, it seemed like everything was going perfectly well, except that at some point, the whole thing simply hanged on Installed u-boot-tools. After some extensive research, it turned out that the problem was caused by the partition layout I chose: ext2 rootfs instead of ext4, which for some reason didn't call the script in charge of updating the /dev nodes after partitioning the disk. Hence, the nodes in /dev/disk/by-uuid/ were not updated and the flash-kernel script couldn't match the (correct) UUID from fstab. When that happens, the tool (in particular the part that generates the initramfs with the rootfs node) shows an error message and waits for input from stdin, which simply couldn't arrive in the installer context. The workaround I used was to run "udevadm trigger" on the installer shell, kill the script and start that last step again. Then it worked.
In the end, the only thing that still bothers me is the incredibly long boot time. It seems to be because the internal mmc is awfully slow: using an external usb disk reduces the boot time from more than a minute to roughly ten seconds.
I am currently working on writing a free software replacement for the Galaxy S3 camera module, based on the Exynos Camera module I wrote a couple months ago for the Galaxy S2. Both are using V4L2, but the implementation differs in details. Especially, the Galaxy S3's back camera, the Samsung S5C73M3, uses an interleaved format for picture capture.
As an interleaved format, there is no standard and readily-usable implementation to decode the data. After searching for a long time, all I could find was a commit by one of Samsung's developers that introduced that format to mainline, through a LinuxTV patch. First of all, I can't seem to understand why such a patch was accepted mainline given that there is no decoder implementation for that format out there. Moreover, the only camera chip that uses it, the S5C73M3, has a driver that was also accepted in mainline. It seems to me like it was blindly included and nobody cared so much about how it works in practice. Moreover, it seems that this camera chip is mostly found in the Galaxy S3, and I doubt anyone tested mainline on the Galaxy S3 to see whether the S5C73M3 driver works and gives appropriate results.
However, let's not complain too much, that patch gave me crucial info to understand how to properly extract YUV and JPEG from the interleaved data. For reference, here are the explanations given with the patch:
Two-planar format used by Samsung S5C73MX cameras. The first plane contains interleaved JPEG and UYVY image data, followed by meta data in form of an array of offsets to the UYVY data blocks. The actual pointer array follows immediately the interleaved JPEG/UYVY data, the number of entries in this array equals the height of the UYVY image. Each entry is a 4-byte unsigned integer in big endian order and it's an offset to a single pixel line of the UYVY image. The first plane can start either with JPEG or UYVY data chunk. The size of a single UYVY block equals the UYVY image's width multiplied by 2. The size of a JPEG chunk depends on the image and can vary with each line.

The second plane, at an offset of 4084 bytes, contains a 4-byte offset to the pointer array in the first plane. This offset is followed by a 4-byte value indicating size of the pointer array. All numbers in the second plane are also in big endian order. Remaining data in the second plane is undefined. The information in the second plane allows to easily find location of the pointer array, which can be different for each frame. The size of the pointer array is constant for given UYVY image height.

In order to extract UYVY and JPEG frames an application can initially set a data pointer to the start of first plane and then add an offset from the first entry of the pointers table. Such a pointer indicates start of an UYVY image pixel line. Whole UYVY line can be copied to a separate buffer. These steps should be repeated for each line, i.e. the number of entries in the pointer array. Anything what's in between the UYVY lines is JPEG data and should be concatenated to form the JPEG stream.
At first, I was only getting the first 0xA00000 bytes, which is in fact only the first plane. Hence, I couldn't find the offset to that pointers array (even though I could locate it manually). I had to enable embeded data with the V4L2_CID_EMBEDDEDDATA_ENABLE control. With that, the buffer gets 0x1000 more bytes: that's the second plane. Then by applying an offset of 4084 bytes to the start of that second plane, I could locate the offset to the pointers array.
Since I complained it was lacking, I wrote a reference implementation that separates the YUV (it's actually UYVY) and JPEG data from the interleaved format: s5c73m3_interleaved_decode.c.
2013-08-06 Update: As I sent an email to the Samsung developers involved in the mainline patch, I was given details on the format (that I already figured out though) as well as a C implementation to separate JPEG and UYVY. The developer also told me he is going to release sample code to decode the format, publicly. So I think things are going to be fine, and my criticism will soon no longer be valid. Yay!
Along with moving on to new studies (I'm done with High School), I got a brand new laptop: an Asus N56VB-S3055H. The hardware specs are really nice, with a quad-core i7-3630QM CPU, 6Gb RAM, 1Tb HDD. I was worried about the integrated nVidia card (GeForce GT 740M) at first, that I suspected to be a cause of problems on GNU/Linux. Thankfully, it does not bother me and the Intel Ivy-bridge card works just fine. I also had the great suprise of finding an ath9k WiFi card shipped with the laptop! You can find a complete hardware review at h-node: Asus N56VB-S3055H
Debian installation
I used to install every new machine with Trisquel GNU/Linux, however I don't really agree with the Linux-libre policy that is about blocking the firmwares load. Moreover, Debian recently made great efforts towards being a fully free distro. So basically, my Debian installation is fully free and the hardware doesn't require loaded non-free firmwares (which means I don't have to use the non-free Debian repo).
Setting up the BIOS
However the BIOS is non-free and it ships with Secure Mode enabled. The BIOS can be accessed by booting with the ESC key pressed and then selecting the option to access Setup. Make sure that you do not let it boot the preinstalled Windows 8 as there is no way to soft turn the computer off if you don't agree to the license terms.
In order to install GNU/Linux, make sure you disable the following options in the BIOS:
Intel Anti-theft technology
Fast Boot
Secure Boot Control
Then enable the following options:
Launch CCSM (you might want to disable PXE then)
UEFI boot with the Debian installer
With such options in the BIOS, you should be able to boot a GNU/Linux installation disc (and probably an USB install media too). However, be very careful: the BIOS only support UEFI boot from the HDD, so you have to install GRUB with UEFI support. In the debian-installer, I only had to create an UEFI partition (at the begining of the disk) and the installer did the rest. It also set the mountpoint to /boot/uefi. Keeping the Windows UEFI partition (make sure to format it though) would probably work too. As a matter of fact, I failed the installation the first time because I removed the partition (and the Debian installer warned me that it was a bad idea). So things aren't so bad in the end, since there is free software support for UEFI booting.
Setting up the touchpad correctly
The laptop has a synaptics touchpad which didn't work correctly at first: drag'n'drop was not at all possible and both click buttons triggered a left click. After some online research, I found one solution that is to use one-finger click for left click and two-finger click for right click. However, this was far from perfect since this is not the expected behavior and drag'n'drop was still impossible. Here is some documentation about how to set that up though: Left-, Right-, and Middle-click on Clickpad .
The real complete solution was adding some options to the synaptics Xorg input driver so that it handles soft buttons, clickpad and multi-touch. It consists in creating /usr/share/X11/xorg.conf.d/75-synaptics.conf with the following contents:
Another feature that was missing was the external subwoofer. A couple of steps are required to enable it, described on the ArchWiki page for another Asus laptop: Asus N55SF Audio. However with strictly this, it still didn't work: I had to step up the Bass Speaker volume in alsamixer (make sure to select the Intel HDA card first) and obviously select the newly created 2.1 Output profile on the GNOME sound config app.
Tuning up GNOME
Since the main graphics chip is an Intel one, graphics acceleration worked out of the box on Debian, and I just ignore the nVidia card for now. That means I had the great pleasure of enjoying the use of GNOME-Shell for some time, but quickly went back to the traditional GNOME-Panel, that I find a lot more convenient for developing. Obviously, a lot of tuning up is needed to make the experience perfect.
Backlight, backlight…
I was very surprised with the way GNOME handles both the panel backlight and the keyboard backlight. Basically, these can be dynamically tuned with the media keys (Fn+Something combination keys), which works fine, but none of these changes are kept between sessions and reboots. That means I have to change these after every single login: that is so annying. So my solution was to create an init.d script that stores the backlight values at poweroff and to use a script launched at the GNOME session startup to bring back the previously stored values. It's a shame I have to do this, such basic support should come out of the box with software as popular as GNOME is.
Themes, icons, compositing
Even though it has glitches, I always prefer enabling compositing in metacity so that stuff looks better (transparency, round angles, etc). Since GNOME switched to dconf, here is how I enabled compositing: using dconf-editor: org > gnome > metacity > compositing-manager.
As for the themes I use: Shiki-Colors-Metacity, which is packaged in Debian for window borders, Gnome-brave for icons (packaged as well) and Zukitwo-Sark for GTK+. For the latter, make sure to install its dependencies to avoid unexpected results:
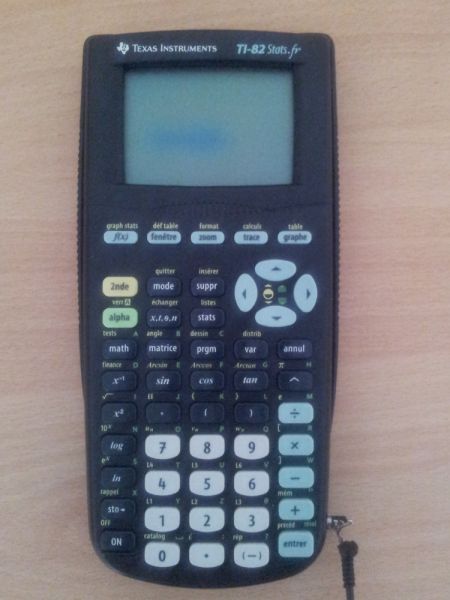
As I am a student in High School, I was told to buy one of these TI-82 Stats.fr scientific calculators.
Despite the fact that it runs a proprietary operating system, I had to use it in class for nearly 3 years now and it's not even really convenient to use, especially the programming part. TI created the TI-Basic interpreted language, that the user can use directly by writing programs on the calculator, which is awful. As I was looking for a fast way to write large programs, I looked into the possibilities that existed to connect my calculator and my computer and then write the programs on my computer and transfer them to the calculator.
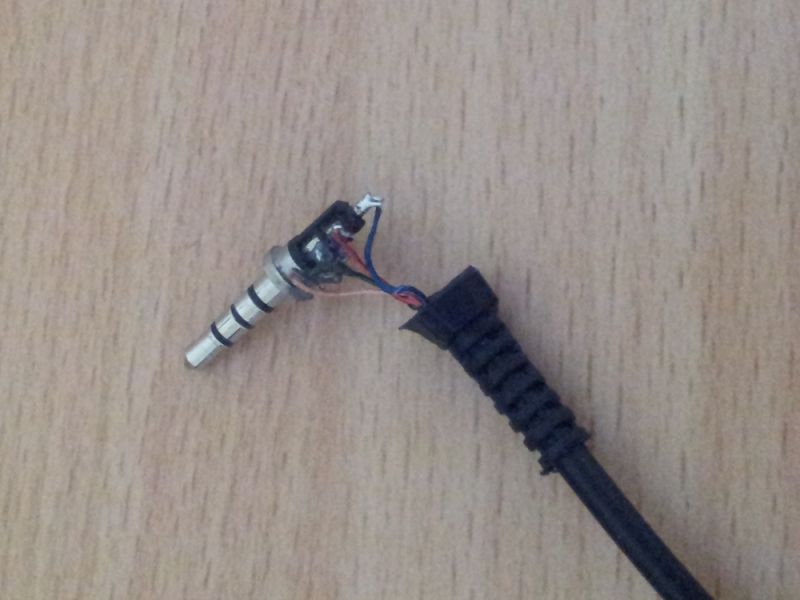
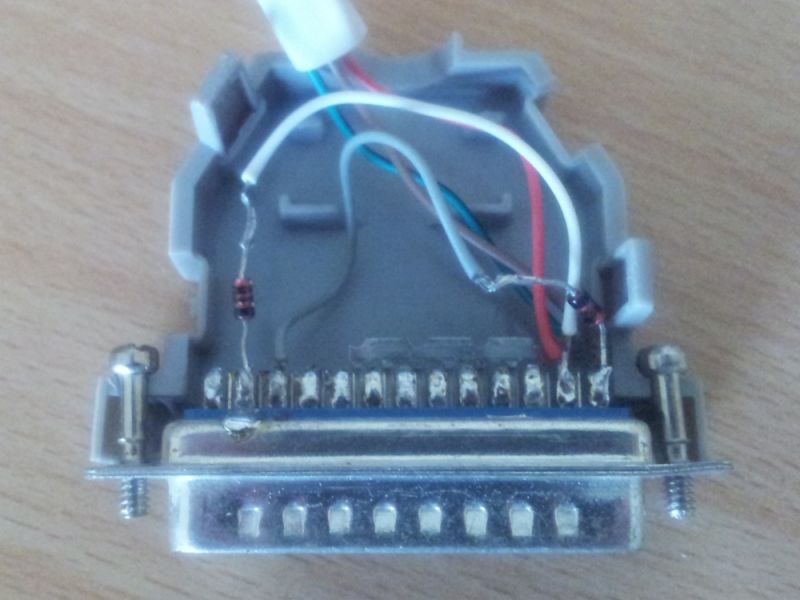
Making the cable
So I ended up making a cable using only a male DB25 port, two diodes and a 2.5 mm stereo jack: I lent the original calculator to calculator transfer cable at the time I wanted to do this, so I used a 2.5 mm audio jack I had instead. This jack had a microphone ring too, that I wired as ground. However, I guess it's better to not cut-off a wire and use a female 2.5 mm stereo jack connector instead.
Schematics for the connector are easy to find on the internet but they do not mention whether the connector is seen from its front or back. As a result, I soldered the wires in the wrong order and ended up with a non-working cable. However I though this might happen so I inverted the cables layout and it worked!
The software part
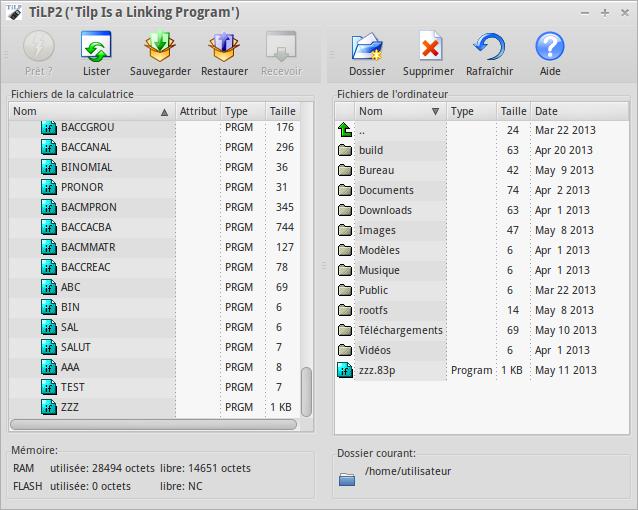
As the cable was ready, I had to figure out the software part. First, I had to find a computer with a female parallel DB25 port (my recent computer didn't have one since printers, that used that port, are now essentially wired with USB). Then, I looked up what software could handle this. I was amazed to see that there is a whole set of free software libraries to handle the TI calculators, so hopefully, not much was to be done here. I found tilp2 to be a nice front-end for all these libs and decided to go with it. At first, it couldn't use the parallel port because lp was already using it, so I had to unload the lp module so that it could work. After that, the automatic detect function detected my calculator just fine, as a TI-83 (while it is in fact a TI-82 Stats).
Downloading and uploading programs with the calculator worked just as well. Though, I discovered that the programs are not in plain text but have headers, a checksum and a special encoding of what's not plain ASCII text (such as the functions names, the operators, etc). Then, what I needed was a compiler for the TI-Basic language, and I could hardly find one. What came closest to it was the tibasic program, that is free software for Windows, but was ported to GNU/Linux (a matter of writing a Makefile and minor modifications). Though, the files produced by that compiler turned out to make tilp segfault when sending them. After looking closer at it, it turned out that there were differences in the produced header compared to the one of files that came out of the calculator.
So I decided to quickly write such a compiler, matching the expected format for the TI-83, to compile my programs. It was very easy and fast and ended up as the ti83c compiler. Since it is based on the tibasic compiler, I kept its same license and added the original author as a copyright holder of ti83c too, so it's not released under the GPL, but another free software license described in the copyright header block. I didn't test ti83c extensively, but for the programs I wrote, it went just fine.
I recently acquired an Allwinner A13 unbranded tablet in order to port Replicant to it: this platform is well supported by free software (the Linux kenrel and the u-boot bootloader) and there is an active community of developers working on free software for the Allwinner A1x platforms: linux-sunxi.
The tablet I ended up with contains an Elan EKTF2000 touchscreen, but I couldn't find any touchscreen driver for it in the linux-sunxi kernel tree: the source code was just not released, even though it's marked as being GPL-licensed. Moreover, since the tablet is unbranded, there was no one I could contact to request source code. So I asked around, and it turned out that nobody knew about source code that would have been released for that touchscreen. However, the tablet came with Android preinstalled and there was an ektf2k.ko module.
After some research, I finally found a driver for elan ktf2000 touchscreens written by HTC. It seemed to match mine (both use I2C) and preliminary tests revealed that the same protocol (on top of I2C) was used by my touchscreen. However, it was not quite enough to write an usable implementation for my device: as a matter of fact, the returned coordinates from my touchscreen did not match the screen size: it reported values up to 896x576 while the screen size is 800x640. So the whole issue was about figuring out these values (896 and 576) at run time in order to scale down to the actual screen size.
The preinstalled Android system came with a kernel module called ektf2k.so which is the actual driver. When loaded, I saw this message on the kernel logs:
[elan] __fw_packet_handler: x resolution: 576, y resolution: 896
Which meant that this driver had the code to get the values from the touchscreen chip.
I quickly understood how the touchscreen protocol works by reading the HTC driver, and it turned out that requests were arrays of 4 bytes, with the first one set to 0x53 (indicating a request) and the second one set to a particular command (indicating what we request). Now considering that requests are usually static tables that are defined in code (that's the way it's done in the HTC driver), declared at the beginning of the function, I knew that the static array of 4 bytes corresponding to the request for the size I needed to find out was held somewhere in the ektf2k.ko module.
Thanks to objdump, I decompiled the module (it is legal to perform such reverse engineering in Europe) and looked at the assembly code for the function __fw_packet_handler. I clearly saw the different calls to elan_ktf2k_ts_get_data and printk, but no sign of the data packets. I then looked at the .rodata section, that contains, as its name suggests, the read-only data, where the packets would likely be stored. The string “__fw_packet_handler” is stored at offset 0170 In this section. Right before, I found the following data:
Looks very much like static arrays of data with the first byte set to 0x53! So I tried issuing requests with the commands 0x00, 0x60, 0x63 and 0xf0 and received the height with 0x60 and the width with 0x63! It was not in the most obvious format but 576 is 0x240 and 896 is 0x380, so it was easy to see that the responses were containing these values.